Empowering Parents To Teach- Balancing Chemical Equations

Balancing Chemical Equations With Lego Bricks

Our fantastic science mom, Staci, has created another engaging science activity for us. This time she shows us how we can teach our kids how to balance chemical equations using Lego bricks!


Before you read the activity, print out the Chemical Equations Worksheet so that you can refer to it as Staci explains how to use it!


From our science mom:

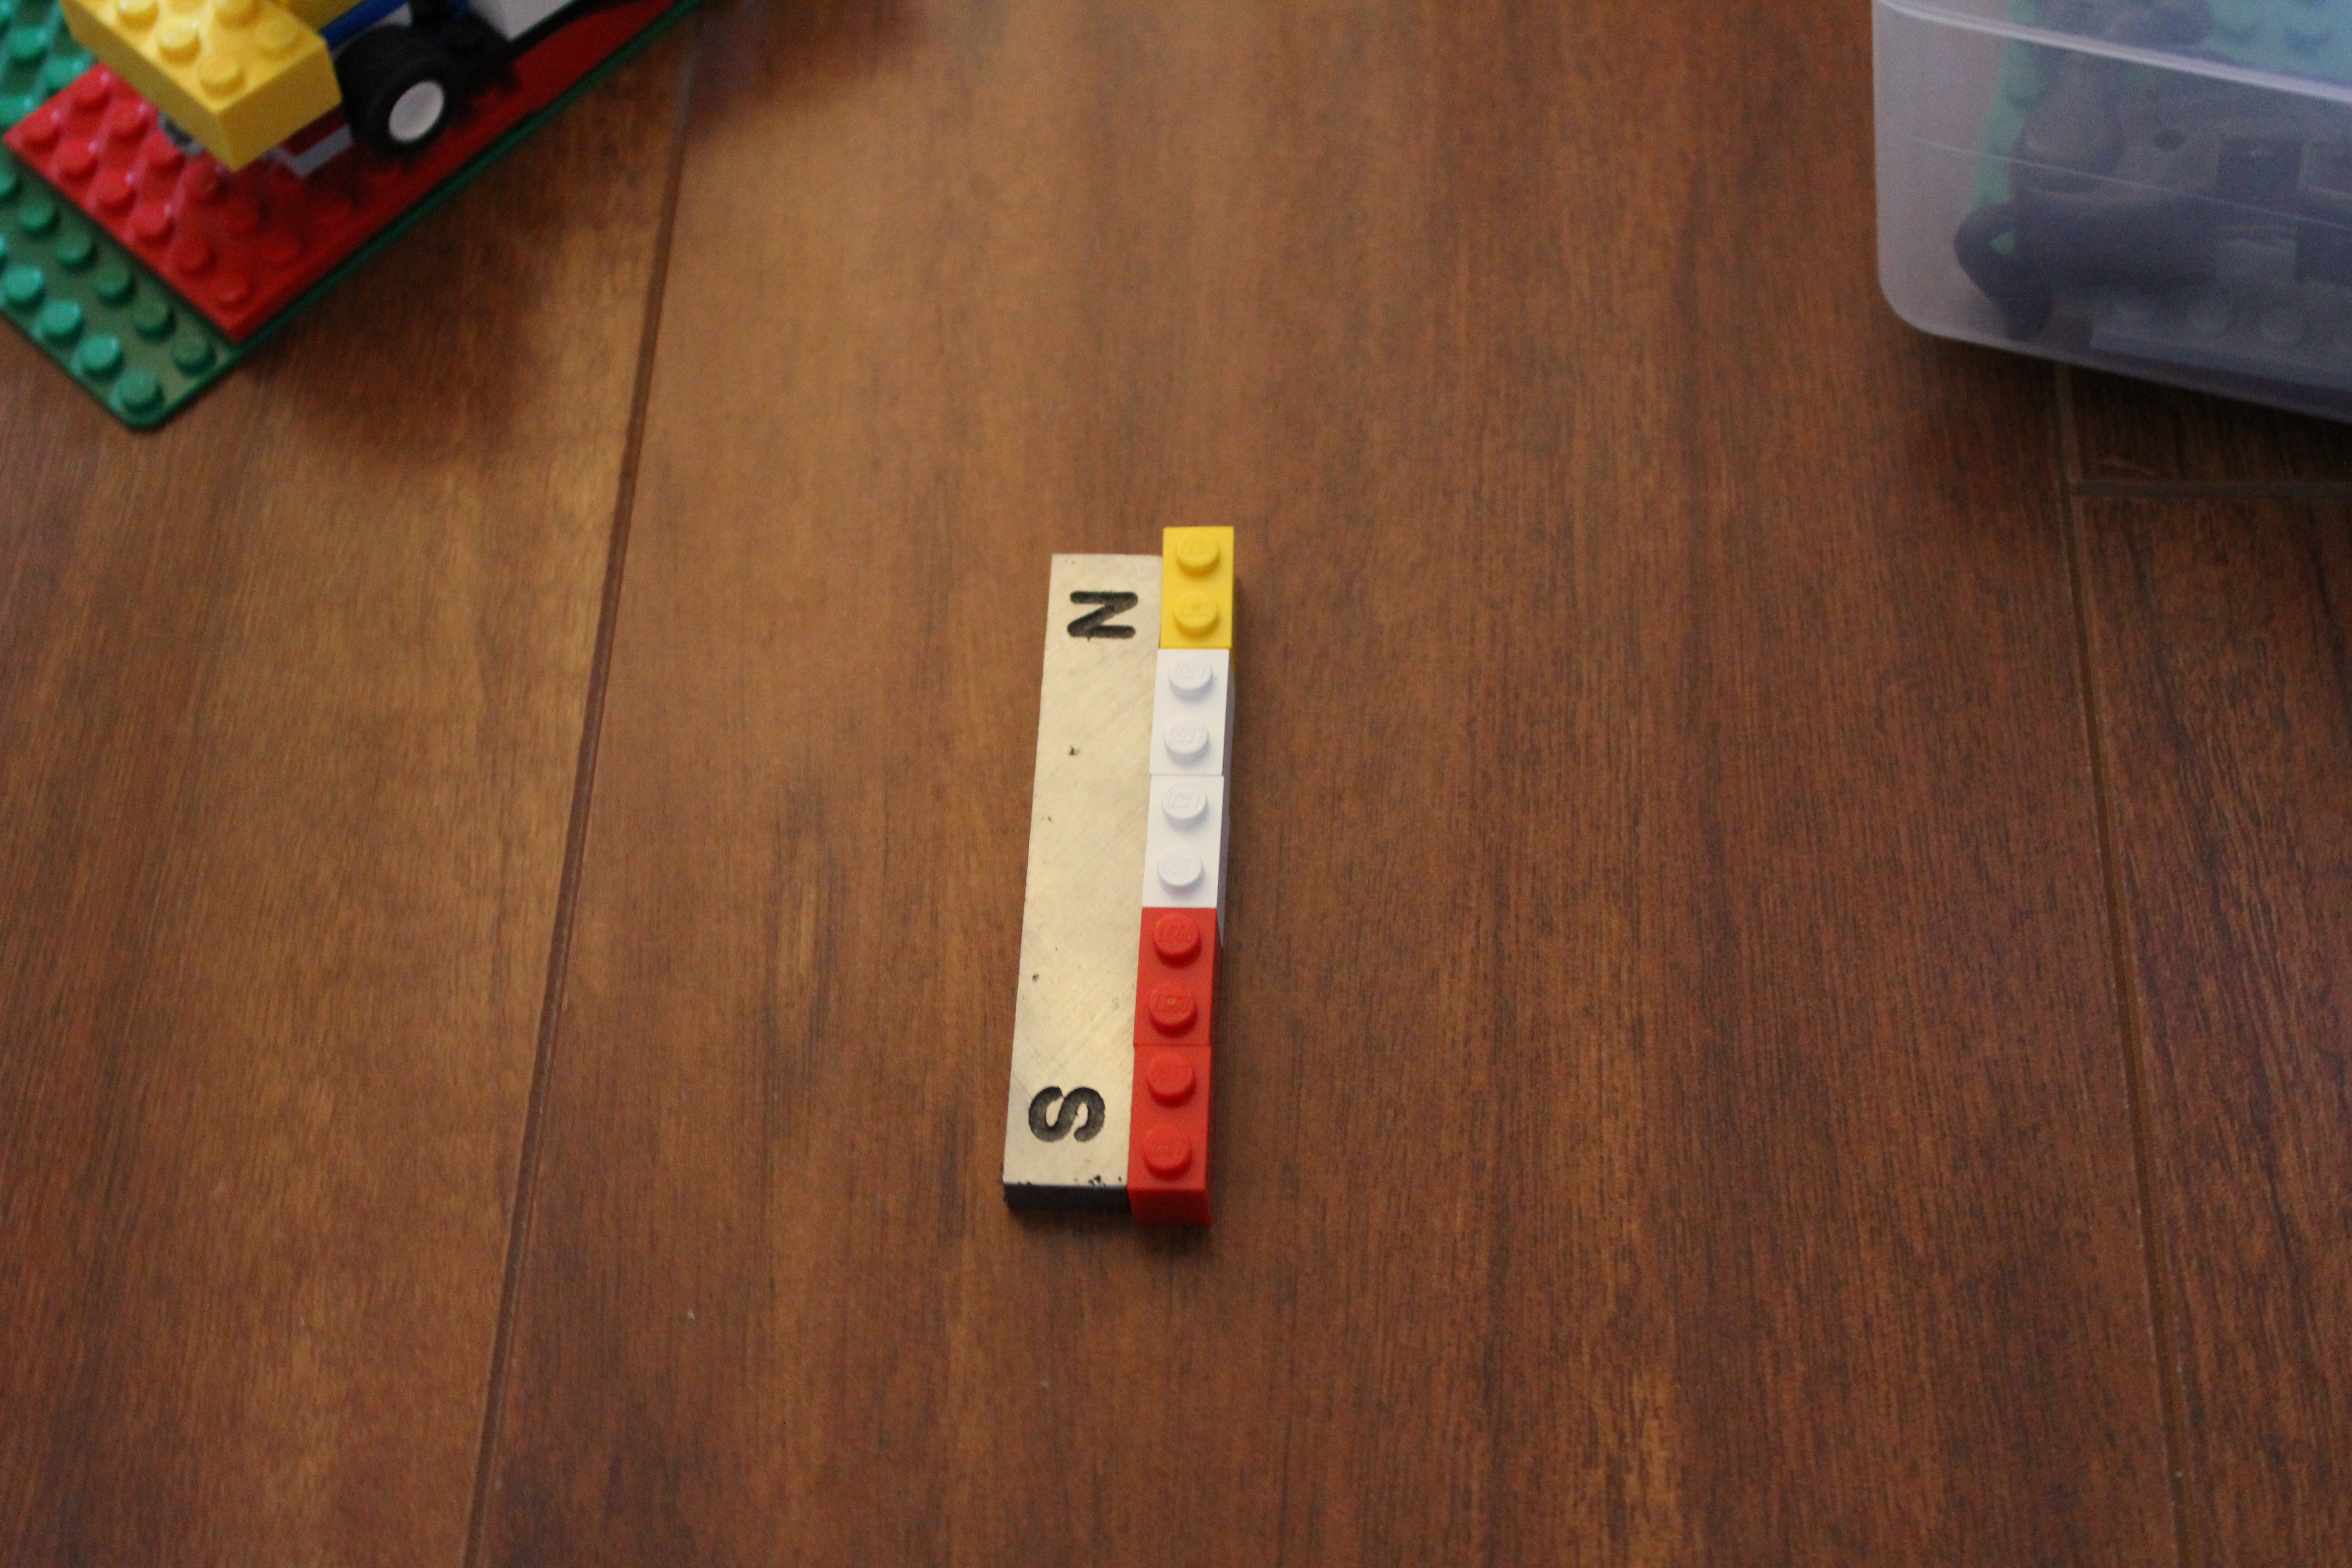
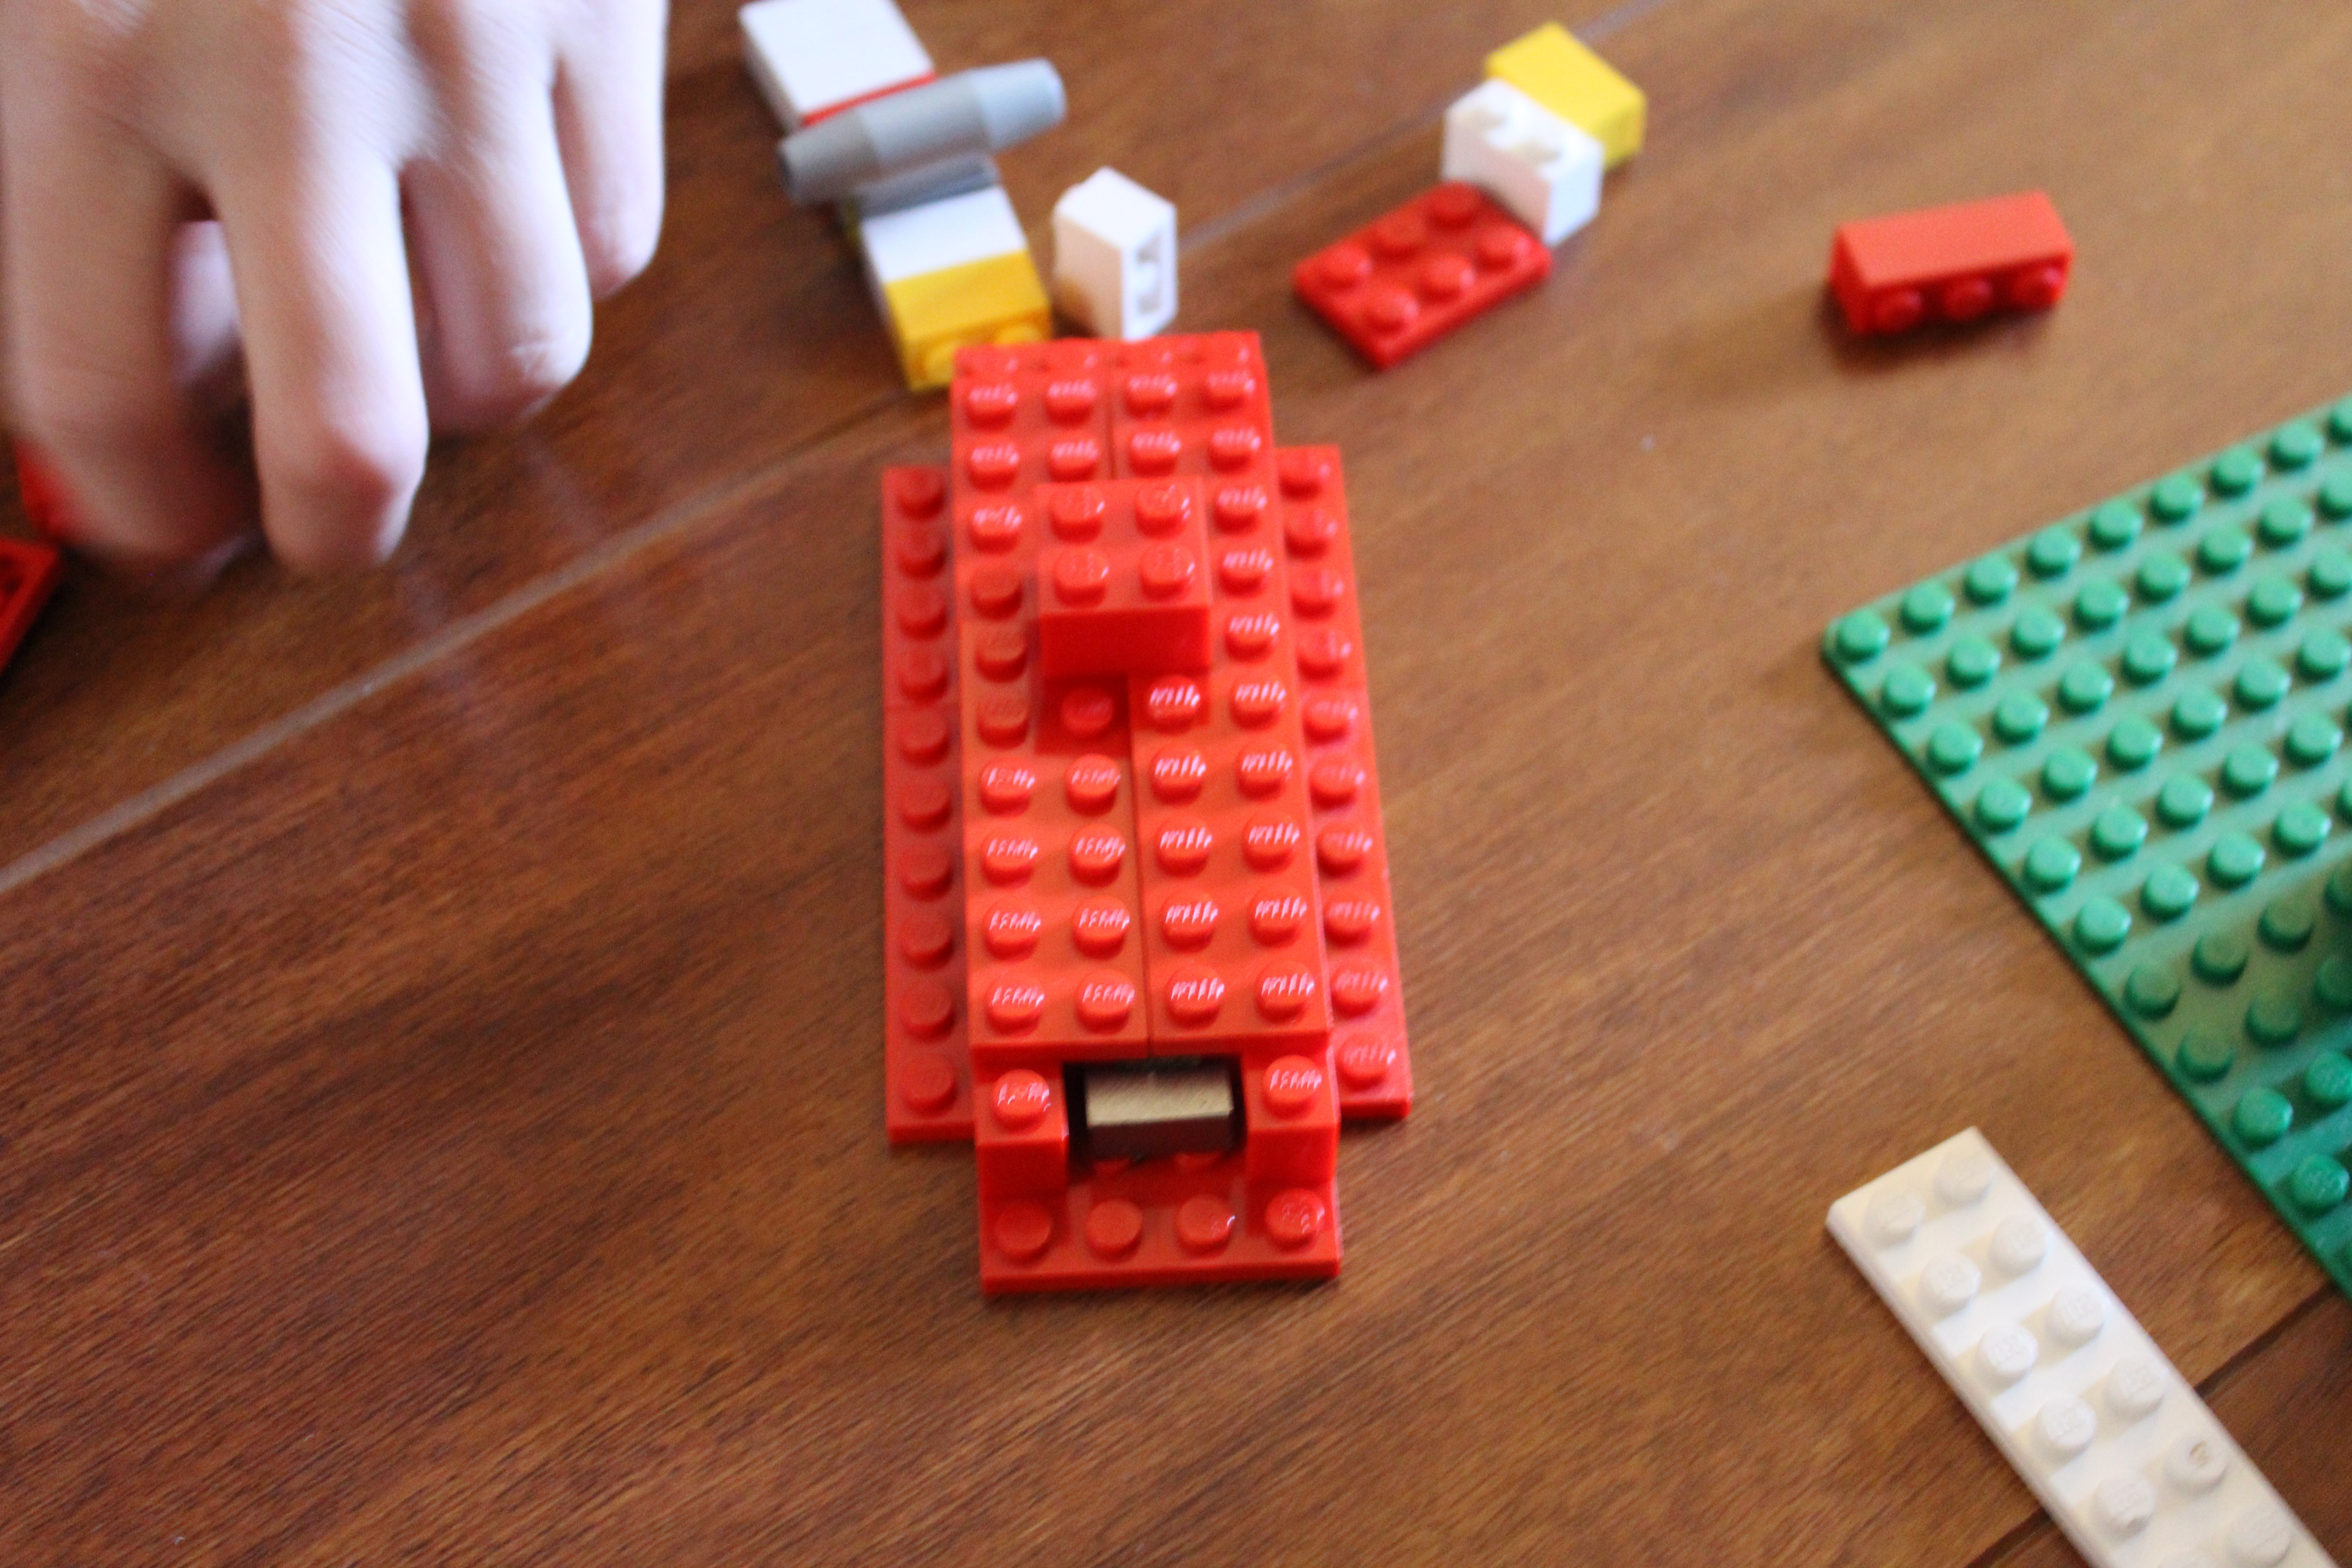
Recently, my son found a song about the periodic table on YouTube.  He watched it repeatedly and then followed it up with episodes about Chemistry on YouTube from CrashCourse.  I wanted to think of something I could do with him for our Science Saturdays that expanded on the topics he was learning.  I came up with an idea to balance chemical equations using Lego bricks.  I thought using Lego Bricks as manipulatives would make the concept more concrete and easier to grasp, and also because we have eleventy billion Lego bricks scattered in all the corners of our home.  If you don’t have many Lego bricks of many colors readily available, mathlink cubes could be another good option.  We own several molecular modeling kits, but there aren’t as many different color atoms available in these kits and the bonds are often difficult to manipulate.


I started by creating 20 equations for my son to solve.  I made equations with “chemical symbols” that referred to the color Lego he should use rather than actual chemical symbol to avoid unnecessary confusion.  We then gathered around 8 blocks each of 5 different color Lego bricks (white, blue, green, yellow, and red).  We started our activity by talking about a key concept: Conservation of Matter.  The Law of the Conservation of Matter states that the mass of a system must remain constant over time in a closed system.  In reference to balancing chemical equations, this means that the number of atoms of reactants must equal the number of atoms in the product.  Or as we said “what goes in, must come out”.  We also needed to understand the way that chemical formulas are written.  When a number is written in subscript it shows the quantity of atoms of the element it immediately follows.  When a number is written in front of a molecule it applies to all the atoms in the molecule.  For example: H2 shows 1 molecule of 2 hydrogens bonded together, while 2NaCl shows 2 separate molecules of Na bonded to Cl, or 2 Na atoms and 2 Cl atoms in total.


Empowering Parents To Teach-Chemical Equations


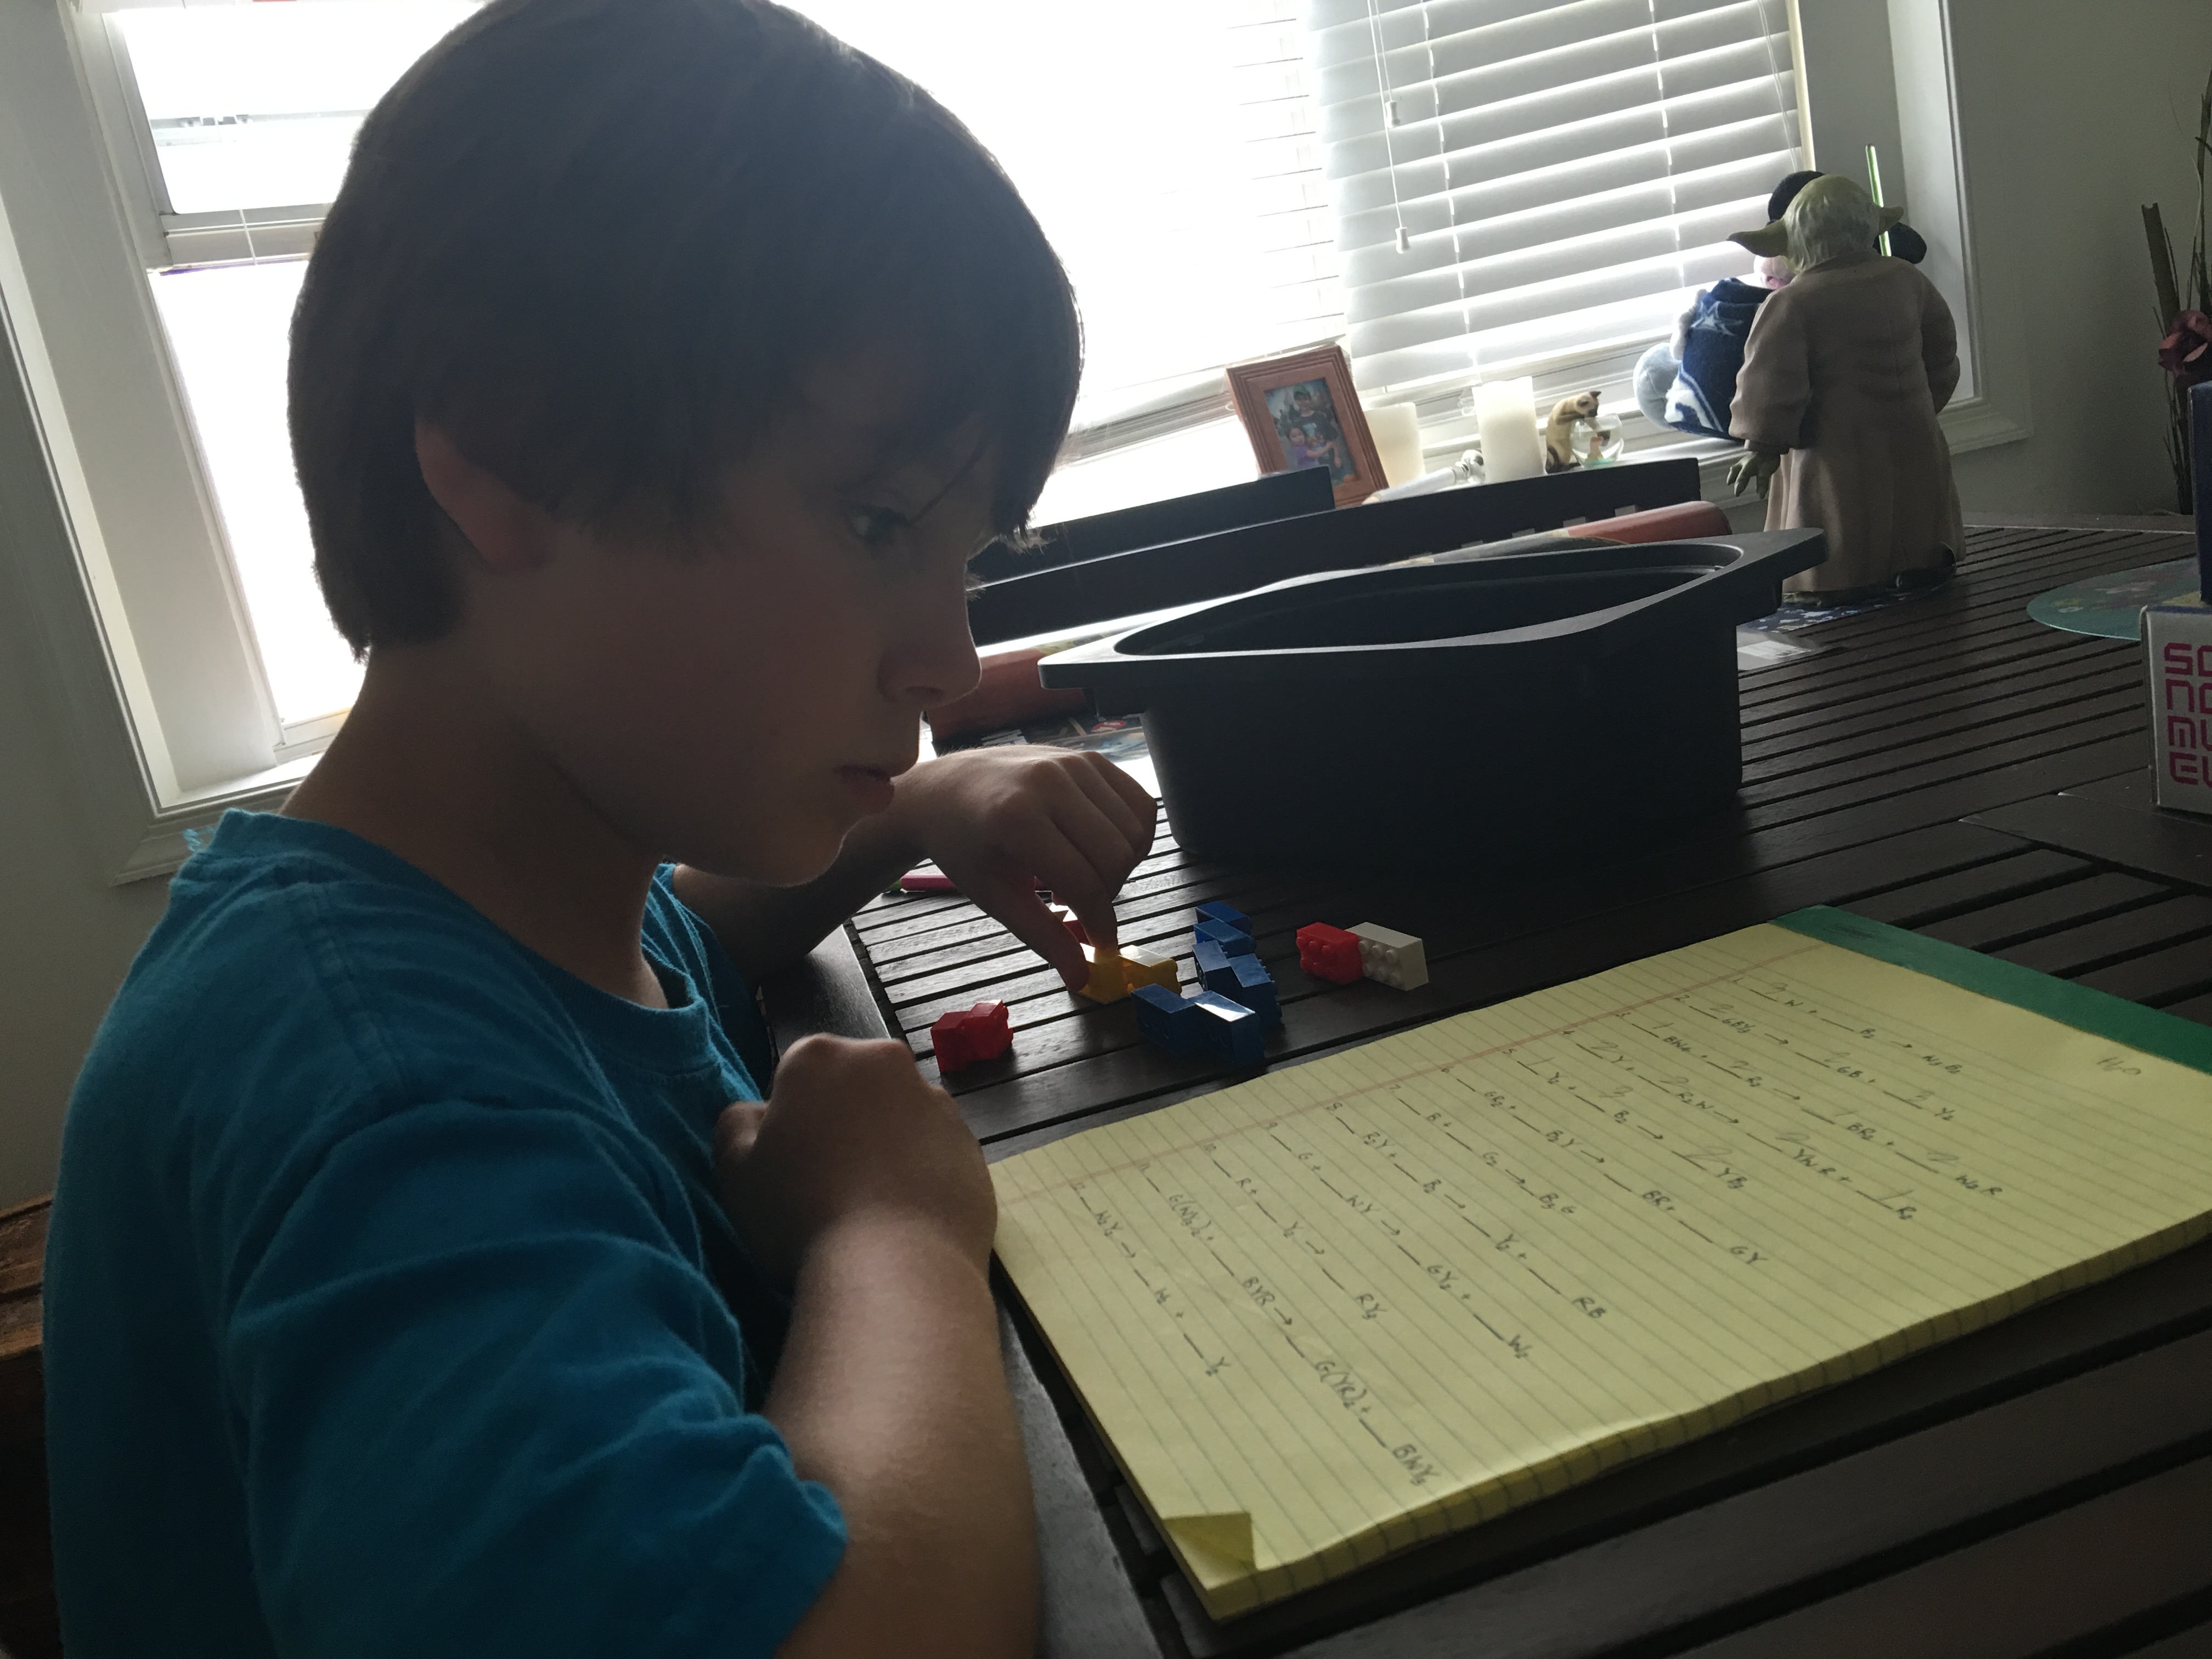
Next, we talked about how we would begin to solve the equations.  My son solved the first 5 or so equations entirely using the Lego bricks.  He began by assembling one molecule of each reactant and then breaking them down to form the molecules of the products.  He quickly observed that sometimes more molecules of reactants would need to be present in order to form the different molecules of product and sometimes there would be leftover atoms that would need to find a home in the equation, perhaps by increasing the number of molecules of product. Using the Lego bricks he was able to visualize where all the atoms were going and where they came from.   


Starting with the 6th equation, he decided he wanted to try to balance the equation using math and then check it with the Lego bricks.  If you are unfamiliar with solving chemical equations, the easiest way is to start by counting the number of atoms in the reactant(s) (the left side of the equation) and then counting the number of atoms in the product(s) (the right side of the equation).  Compare the number of atoms of each element in the reactant(s) to the number of atoms of each element in the product(s).  If the number of atoms are unequal, you next must find the simplest way to equalize them on both sides of the equation.  If you have more than one element to balance, solve for the element that only appears in one molecule of reactant and one molecule of product first.  Add coefficients as needed based on this element and then recalculate the other elements in the other molecules of the equation.  Continue this process until you have balanced your equation.  I was surprised how quickly my son was able to figure out the math of this process and I was impressed when he began to see patterns forming that helped him solve the equations even more quickly.  He gave up checking the equations with Lego bricks about 10 equations into our exercise.


After finishing the 20 equations I had written out for him, he expressed an interest in balancing equations using real chemical symbols that make up real molecules.  I made a short list of 5 equations just for him to try out.  He was able to transfer the knowledge he used with our made up chemical equations to real world equations very easily.  And as a bonus, this gave us a chance to practice identifying elements by their chemical symbol and also the nomenclature of molecules.  


After spending so much time doing math and worksheets, I thought it might be fun to see a chemical equation in action!  I wrote the equation for the reaction of baking soda and vinegar and asked my son if he recognized any of the molecules and asked him if it was a balanced equation as written.


NaHCO3 + CH3COOH → CO2 + Na+ + H2O + CH3COO-


Note:  Vinegar is a mixture of many different chemicals.  It is typically 5% acetic acid dissolved in water, so the molecular formula for acetic acid is used in this equation.


This equation is balanced as written, but we wondered how we could prove that the equation is an accurate description of what took place.  Usually we play with baking soda and vinegar in a way that will result in an uncontrolled eruption, but this time we wanted a smaller reaction that we could observe more closely.  We combined a small amount baking soda and vinegar in resealable sandwich bag, and sealed it up to watch the bubbling reaction.  What happens to the bag as the reaction takes place?  How could you test the contents of the bag to validate the chemical equation?  (Hint: O2 is necessary for flame, H2 causes an explosive pop of flame, CO2 will extinguish a flame)


We really enjoyed this activity.  I initially worried that it might be a little advanced for my 8 year old son, but he surprised me with his enthusiasm and quick comprehension.  A few days after we did this activity, I found a Lego “molecule” sitting on the dining room table with a legend defining Lego brick color to chemical symbol and the instructions to solve his Lego molecule’s chemical formula.  I love when enthusiasm for learning something new is carried over into playtime on his own, it makes these activities worth it!


Empowering Parents To Teach- Magnets

Learning About Magnets

Exploring magnetism was a hit in our home school last year. There are many simple, high-interest activities that you can do at home with your children to help them learn about magnetism.


The book Everyday Physical Science Experiments With Magnetism by Amy French Merrill is a very easy to read book that explains how to do many classic and simple activities designed to introduce your child to magnetism. After doing these activities, look for more books at your library to go more in depth with the topic. Additional book suggestions are at the end of this post.


Disclosure: This post contains Amazon affiliate links. If you make a purchase from Amazon, I receive a small fee at no extra cost to you.


To complete the activities we needed to purchase two items:

 Alnico Bar Magnets

Iron Filings


Using the directions from the book, my boys separated iron filings from garlic salt, witnessed magnetic field, and so much more! The instructions were so easy to follow and the activities held the attention of both of my boys, aged 4 and 9 at the time. Here’s a look at some of the things we did:


Magnetic Field

Empowering Parents To Teach- Magnets


Separating Iron Filings

Empowering Parents To Teach- Magnets


Empowering Parents To Teach- Magnets


After we did the activities in this book, we decided to make our own Lego car that we powered by magnets.


Lego Car

First, the boys figured out how long the magnet was.

Empowering Parents To Teach- Magnets


They hid the magnet inside the vehicle.

Empowering Parents To Teach- Magnets


They continued building the car.

Empowering Parents To Teach- Magnets


Finished!

Empowering Parents To Teach- Magnets


Using the invisible force of magnetism, the boys drove the car.

Empowering Parents to Teach- Magnets


Further your child’s study on magnetism with these books and products:


Empowering Parents To Teach- Santa Barbara

Real World Classroom: Science and Social Studies in Santa Barbara

The world truly is a classroom. Last year I home schooled my oldest son for his fourth grade year. I only bought one textbook and it was rarely used. As much as possible, we used our natural environment, hands on activities, and library books. We took opportunities as they came to us. One of those opportunities was a trip to Santa Barbara. My husband was running in the Veteran’s Day marathon that Santa Barbara holds. Since we always go to his marathons to cheer him on, I decided that we would also make this an educational trip for our boys.


Fourth grade standards focus a lot on Native Americans and California mission history. Santa Barbara was the perfect place for my son to learn about these topics. When teaching social studies it is best to use primary sources as much as possible. Primary sources would be actual artifacts or documents from the point in history one is studying. A textbook is written through the eyes of the author and often through a particular cultural lens or even viewpoint of a company or organization. It’s best for my child to see these things for himself and draw his own conclusions. Obviously, he cannot go back in time to witness this history.  Visiting the historical sites and seeing real artifacts is the closest he can get. Naturally, we read books on the subjects and had projects related to the information so that he could delve deeper into the subject and synthesize what he had seen and read.


Santa Barbara has a lot to offer.  We had to narrow it down because we only had a four day weekend and of course one of those days was taken up with the marathon.  Another factor was the budget. Hotels are not cheap in Santa Barbara so we chose carefully about what to do when we were there, hoping not to go broke.  Even if you have a short amount of time and a limited budget you can still have a fantastic educational trip! I’ll share with you what we did.


Chumash Painted Cave

Empowering Parents To Teach- Santa Barbara


The Chumash Indians are one of the most studied tribes in our area.  After reading many books about the Chumash Indians, we were excited to go this cave where paintings that they created are still there! You will see their actual paintings, how cool is that? They are blocked off with bars so you cannot touch them, but it is very visible.  To get to the park, you have to drive up a big mountain.  My kids marveled at the view and commented on how it looked like we were above the clouds.


Empowering Parents To Teach- Santa Barbara

Empowering Parents To Teach- Santa Barbara


Just a couple of days ago we were talking about our trip and my kids were guessing how the Chumash got up there. My boys wondered what was it like to live up high and how the Chumash got food. Because they visited this place, they have a better understanding of the environment that the Chumash lived in. Therefore, they can see why the Chumash developed certain habits or traditions.


Empowering Parents To Teach- Santa Barbara

Empowering Parents To Teach- Santa Barbara

Empowering Parents To Teach- Santa Barbara


This is a California State park so it is free to visit. The constraining factor is parking.  To give you an idea of what the parking is like, see the picture below. You have to find spot on the side of the road that is clear of trees and doesn’t look like you will fall of the edge!  We went early in the morning and had no trouble finding a spot just up the road from the site.


Empowering Parents To Teach- Santa Barbara

Empowering Parents To Teach- Santa Barbara


Click here to visit the park’s website. It is not in Santa Barbara, but it is a very reasonable driving distance from it.


Santa Barbara Mission

Empowering Parents To Teach- Santa Barbara


Twenty one missions were built in California. One of them is right in Santa Barbara. Peek into history by visiting the Santa Barbara mission.  You will see the garden, cemetery, church, and much more.  Your child will have a better understanding of what a mission is by seeing one for him or herself. There is a fee to enter, but parking is free.

For more information on Mission Santa Barbara visit their website: Click here


Goleta Butterful Preserve

Empowering Parents To Teach- Santa Barbara

Goleta is a short drive from Santa Barbara and is a very special place. It is a stopping point for migrating Monarch butterflies. This is a seasonal event. From November to February you can see the butterflies hanging in the trees resting for the next leg of their migration. At first, they can be hard to see since they have their wings closed and the brown of the outside of the wings blends in with the trees. But, if you look carefully, you will notice them, especially if the begin to flutter their wings.


Empowering Parents To Teach- Santa Barbara


Pictures were hard to take. The small spot of orange on one of the trees is a butterfly fluttering (picture below). It was hard to discern the butterflies at first, you had to observe carefully. Once you learn how to look for the resting butterflies, it’s amazing to see. It was really interesting to see how they all hung on the branches together.


Empowering Parents To Teach- Santa Barbara


Not only can your child see migrating Monarchs, the rest of the park provides an exciting landscape to explore.  It’s a natural lesson in geology and biology.


Empowering Parents To Teach- Santa Barbara

Empowering Parents To Teach- Santa Barbara

Empowering Parents To Teach- Santa Barbara

Empowering Parents To Teach- Santa Barbara

Empowering Parents To Teach- Santa Barbara

The park is free to enter and parking is free too.  For more information about this park: Click here


Besides, do you really need an excuse to go to Santa Barbara? This place is gorgeous!


Empowering Parents To Teach- Santa Barbara

Empowering Parents To Teach- Santa Barbara


Our samples ready to be tested.

Exploring Acids and Bases


About our guest author:  Staci is a mom and cancer biologist who loves exploring science with her two kids at home. Empowering Parents to Teach is proud to feature the fantastic ideas that Staci does at home with her own kids so that we can do the same in our homes too!


From our science mom, Staci:

I spend a lot of time thinking about science experiments to do with my kids. Sometimes I take the lead from my kids and we explore something they are interested in. Sometimes I introduce new concepts that blow their minds. And sometimes we do things just because I want to see what happens myself! This week’s experiment happened because we had some leftover red cabbage and I wanted to try something I’d never done before.


To prepare for this experiment, I boiled half a head of chopped red cabbage for about 20 minutes and then placed the strained liquid in the refrigerator to cool overnight. The liquid left after boiling red cabbage contains a class of molecules called anthocyanins that will change color based on their environment and can indicate acids and bases. I also made a chart of approximate pH values based on the color of the red cabbage indicator to reference during our experiment.


Empowering Parents to Teach- Acids and Bases

Red cabbage boiling on the stove


When we were ready to begin our experiment, I asked the kids to think about what type of liquids they would like to test for pH. They talked (argued) about what they would like to test and came up with 10-15 different liquids we could test, such as water, milk, glass cleaner, apple juice, and more. Along with the table of approximate pH values, I made a chart they could fill in over the course of our experiment. The chart had spaces for sample name, cabbage indicator color observation, cabbage indicator pH value, and pH paper value. Before we began to test our samples, I asked my son to predict whether the samples would be acids or bases.


Our samples ready to be tested.

Our samples ready to be tested.


I filled the cups of a mini muffin pan about a third of the way with our test samples. The kids then took turns adding a transfer pipettes full of red cabbage indicator liquid to the samples and recorded their observations. Very dark liquids (such as soda or coffee) were difficult to observe a color change, but overall, this activity was successful and we were able to see very obvious changes of the red cabbage indicator. When all observations had been made, my son used the reference chart I made to assign an approximate pH value to the samples.


Empowering Parents to Teach- Acids and Bases

Adding red cabbage indicator to test samples


Empowering Parents to Teach- Acids and Bases

Our finished test samples


Click here to print your own copy of the Red Cabbage Indicator Table


This experiment can end here, but as an extension we wondered how accurate the red cabbage indicator was of pH. I happened to have pH paper, so we were able to obtain a more exact pH value and compare with the observations we made with the red cabbage indicator. If you are interested in purchasing pH paper for your own experimenting, you can find some here: pH paper


I refilled our muffin pan with fresh sample to test with the pH paper. My son then dipped the pH paper in the samples and compared the color result to the color chart on the pH paper container. We finished up this project by filling in our experiment chart and discussing our results.


Empowering Parents to Teach- Acids and Bases


Empowering Parents to Teach- Acids and Bases

Completed table


Click here to print your own copy of the pH worksheet


We discussed whether his acid or base predictions were correct and whether red cabbage juice makes a good pH indicator compared to the pH values he observed with pH paper. We discussed which types of liquids gave us the best results with red cabbage juice and hypothesized about what they may have in common. We wondered if the temperature of the red cabbage juice would affect the outcome of this experiment.


This is a fun, easy experiment that you can do at home. My kids had a great time choosing their test samples and have already asked to try this experiment again. My son wants to try all the sodas and all the juices at the grocery store to see the pH range. That may be a bit out of scope for us, but it’s definitely great scientific thinking!


*This post contains affiliate links. I receive a small percentage of the Amazon sale at no extra cost to you.


This post is linked to Montessori Monday:

Montessori Monday

Empowering Parents to Teach- Fall

Celebrating Fall

With the first day of Fall around the corner, I have been busy planning a Fall themed day to celebrate!


On the first day of Fall, I plan to read three fabulous books to my boys.

Mouse’s First Fall by Lauren Thompson is geared to younger kids. Mouse excitedly runs and jumps in the leaves as Minka (another mouse) shows him all the beautiful shapes and colors of the fall leaves.  This book is perfect for young ones just discovering the beauty of the changing season.

Fletcher and The Falling Leaves by Julia Rawlinson is my new favorite book.  Rawlinson is a fabulous descriptive writer.  You can feel Fletcher’s concern and love for this tree as he desperately tries to help the tree keep its leaves.  It ends with a beautiful winter scene that shows Fletcher that the tree was preparing for a new season and that the tree will be ok without its leaves.  As much as we will read this book for enjoyment, it is also a wonderful mentor text for older children learning to write using vivid descriptions, precise verbs, and well developed characters.  I got this book at the library, but I am definitely purchasing this one to keep in our collection at home.

To add a bit of whimsy and humor to our day, we will also read Fall Mixed Up by Bob Raczka.  This story takes all the aspects of fall and switched them around.  For example, a bear is finding nuts and the geese are hibernating!  Your kids may a get a chuckle out of this one. They can “fix” the mix ups by correcting the silly sentences with true ones as you read.  It may even inspire your little ones to write their own silly story or poem.

We are a very science oriented family, so naturally we have to do a little bit of Fall science.  We read the book Why Do Leaves Change Color by Betsy Maestro already, so on the first day of Fall we will explore the colors and pigments found in leaves.  I found a fabulous website with many photosynthesis experiments and demonstrations.  Click here for the link to Seattle Pi where I found our latest science fun.  The demonstration we will do is under the heading, “Photosynthesis and Pigments”.  Using rubbing alcohol and white coffee filters your kids can see all the colors that are inside a leaf that we normally don’t see until the diminishing light of Fall and lower temperatures break down the chlorophyll.  Not only can your kids learn about leaf pigments with this demonstration, they are also learning about chromatography!


Getting our supplies ready


Happy First Day of Fall!


This post contains affiliate links.